How I Wash My Makeup Brushes
I've heard that many people dread washing their makeup brushes, but I can't seem to relate to that. I don't love it, but I don't dread it either. There's something satisfying about seeing a dirty brush turn clean again. It's important to regularly wash your brushes because when you use them, they colloect oil, dirt, and bacteria from your face. When you re-use them, you're just re-applying all of that gunk to your face! Although you don't have to wash them every single day (since that would be quite impractical), I wash mine about once a week.
The Soap
I usually use any old liquid hand soap, but this time I used Dr. Bronner's Peppermint Pure-Castile Liquid Soap, and let me tell you, this removes cream and liquid makeup WAY better than the hand soaps I had been using. Plus, it makes your brushes smell like peppermint! I used the 16-ounce bottle, which you can buy here for $10.99 USD. It's currently on sale for $9.34 USD, so hurry to get it! Most soaps can make your brush dry out over time, but this one is less likely to as it contains coconut and olive oil, which condition and re-hydrate the bristles. Other things you could use include baby shampoo or brush cleaner. If you use any type of soap without coconut or olive oil, I recommend also using some extra virgin olive oil mixed in.
The Brushes
Here's the majority of the brushes I had to clean. One is an e.l.f. Powder Brush, and the rest are from sets. One set is a Morphe set, but it was a Hautelook exclusive. The other is a Real Techniques set, which will be featured in an upcoming post if you want the details.Step One: Wet the Brush
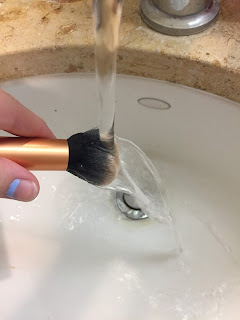
Please ignore my badly chipped nail polish - I have to get around to removing it. I start out by wetting my brush so that the soap can work up a good lather when I use it. This can also get off the tiniest bit of makeup, but it's mainly so that the soap works better.
Step Two: Soap
Next I put a few drops of soap into the palm of my hand and swirl the brush around in the soap. Do this very gently so as not to damage the bristles. Use no more force than you would if you were washing your face. Make sure to get further up into the bristles too, in order to get out all the makeup. Repeat this step until no more makeup is on the brush. You can tell it's clean when the lather is no longer discolored.
Step Three: Rinse
This step is very important. You don't want to get any leftover soap on your face because it can be harsh or irritating. Make sure to hold the brush with the bristles pointing downwards so that the soap and/or water doesn't get into the ferrule of the brush. This can dissolve the glue that holds the bristles in the brush and cause hairs to fall out over time. Rinse and occasionally squeeze the bristles until no more soap comes out.
Step Four: Dry and Reshape
Dry the brush by gently rubbing it in a swirling motion on a towel to remove most of the excess water. Again, use no more force than you would washing your face. Once the brush is as dry as you can get it, reshape it. Try to eliminate stray hairs, as these can make it hard to evenly apply your makeup. This is especially important for eye shadow brushes.
Thanks for reading! I would appreciate any feedback you have for me, so if you do have any, please leave a comment! I also have a Twitter now, which is @makeupwmaggie.


No comments:
Post a Comment