Saturday, October 24, 2015

Halloween Vampire Mouth

Quick Halloween Idea: Vampire Mouth

I wanted to finish off this week with another Halloween tutorial, and I decided on a vampire's mouth. There's lots of different ways to do the eyes and face - you can be a creepy or scary or sexy vampire, but the mouth stays mostly the same - you need fangs and blood.

I started by making fangs with white face paint. Make sure it's non-toxic, since you could accidentally ingest some.


This step is optional. I decided to paint the rest of my lips red. You could go for pale lips or a darker red as well.


Lastly, use a small brush to paint on some fake liquid blood. You could use more than I did to give it a drippy, fresher-looking appearance.

Halloween Spiderweb Eye

Quick Halloween Idea: Spiderweb Eye

When I think Halloween, I think of ghosts and spiders and pumpkins. I wasn't sure how to do a ghost or pumpkin look, so I went with a spiderweb. This only takes about ten minutes and it's pretty easy, even for beginners. The shadows I used are from the Makeup Revolution Essential Mattes palette.

Apply the 5th shade from the left to the crease. It doesn't really show up on my skin color, but it gives you something to blend the other colors into.


Apply a white cream base to your eyelid so that your lid color will pop.


Apply the 12th shade from the left to your lid and blend it into the crease color.


Apply the 9th shade from the left to the outer corner of the lid.


Line the eye and draw the spiderweb. You can make it bigger or more complicated than I did if you want - always feel free to customize any of my tutorials so that you like them better.


Curl your upper lashes and apply mascara, and you're done! I would pair this with a bright red lip, and maybe I would draw some spiders on the side of my face with eyeliner, but this is just the simplest version of what you can do with this look. Have a fun and safe Halloween!

Halloween Leopard

Quick Halloween Idea: Leopard Print

For my third Halloween tutorial, I wanted to do something super easy that could be done with makeup that most people would already have or be able to get easily. I did this on the back of my hand, but you could do it on your face and neck and pair it with my cat tutorial for a great leopard costume. It only takes a few minutes and it comes of easily.

Start with a brown base. I used the sixth shade from the left in the Makeup Revolution Essential Mattes palette.


Using a brown eyeliner, draw on some spots. Make them random but still somewhat circular or ovular. You could just leave it here, or do the next step.


Outline the spots with a black eyeliner. A matte black is preferable, because as you can see the shimmer doesn't look too good. You can also leave this step out and still have it look perfectly fine.

Halloween Bruise

Quick Halloween Idea: Simple Bruise

For this Halloween tutorial, you'll need black makeup, green makeup, yellow makeup, red makeup, and blue makeup, as well as a makeup sponge. I used a face paint set from Rite Aid and the sponges included with it. You could also use eyeliner and eyeshadow, but I don't know if it would turn out the same.

Starting with black, put some face paint (or whatever you are using) on a sponge and use a stippling technique to cover an area slightly smaller than you want the bruise to be. This provides a dark base for the bruise.


Cover the black with green. It's looking more like a grass stain than a bruise right now, but it'll get there.


Layer blue and red to achieve a bruise-like purple near the center of the bruise.


Keep layering colors until you get the effect you want. I also added some yellow around the edges to make it look like the edges of the bruise were starting to heal, but this is optional. It will make the bruise look older. I think it makes the bruise more realistic, but again, this is optional.

Halloween Cat

Quick Halloween Idea: Easy Cat

In the spirit of Halloween, I wanted to do a few quick and easy fun little Halloween costume ideas. I decided to start with the easiest I know how to do, a cat. I used face paint for this, but you could use black and white eyeliner or cream eyeshadow to do the same thing.

Start with the cat's muzzle (is that what it's called on cats?). I used white face paint I got in a set from Rite Aid, but a white shadow stick would probably work just as well.


The next step is the nose. You could also use pink for this, but I only had black.


After that, draw a line from the middle of the nose down to the middle of your upper lip and fill in your upper lip with black.


Lastly, whiskers! Mine are a bit messy because I used too stiff of a brush, but you get the idea. You could do as few as three or do even more than this if you wanted to. I would pair this with a cat-eye eye makeup and big false eyelashes, but you could also leave it at this. If you want it to last all night, set it with a translucent powder and setting spray.

Sunday, October 18, 2015

Haul Time Again!

Rite Aid and Dollar Tree Haul

I've been doing a lot of shopping lately, and this is probably the last of it, but I got some beauty related items I wanted to share. I went to Rite Aid and Dollar Tree this time.

The first thing I got was this Halloween makeup kit. I needed some stuff to paint on fake scars with, and this looks like it could work. It's usually $9.99, but I got it half off.


Next I got the full size of this face mask that I had tried once before in the single use size and loved. It really helps me get rid of breakouts, so I figured it was a good purchase.


I also picked up these two NYC nail polishes that were on sale for 99 cents each. I probably won't wear them super often, but for less than a dollar, you really can't go wrong.


After that I got this pretty Wet' n' Wild nail polish. I have gold glitter polishes, but no solid gold polishes, and I decided that I wanted one.


The last thing I got from Rite Aid was this NYC lip balm. It has a little apple shape in the middle which I thought was cute, and I'm always willing to try new lip balm!


My Dollar Tree has started carrying Baby Lips Electro! These are the three colors they had left when I got to them. I already have the orange one but it's my favorite so I decided to get a backup.


Lastly, I got one more pack of Essie sleek sticks. I've been loving these lately and these ones looked cute so I got them.

Jewelry Haul

ShopMissA Jewelry Haul

I recently made another purchase off of ShopMissA, this time mostly jewelry. It took about a week to arrive, and I expect it would have taken less time if there hadn't been a holiday that delayed shipping. I also got a bit of makeup, which I'll include at the beginning of the haul.

First off, the makeup! I didn't get much, since this order was mostly jewelry, but I couldn't resist how cute the lip balm and lipstick were! I got the eyelashes because they were a good deal, and I got the lip scrub because my lips get chapped a lot and I wanted to try exfoliating them more often.


Next I got a bunch of eyeshadow brushes because I really don't have enough. I know I love the e.l.f ones, and I wanted to try out the one from Kleancolor.


After that I got some nail glue and some glue-on nail studs. I wanted the studs for my Halloween costume (I'm going as my Dungeons and Dragons character), and I didn't have any nail glue, so I figured that for a dollar each, I couldn't really go wrong.


I also got some hair things for my Halloween costume. I'll be wearing a wig, and it doesn't look the best, so I'm hoping that these will make it look a bit nicer.


For the first jewelry items, I got a bunch of rings. I had another owl ring, but I gave it to a family member as a gift. These are almost all for my Halloween costume, but they'll all look nice for everyday wear as well.


Next up are these rings and the bracelet. I thought it was unique because the bracelet attaches to a ring, and it looked really pretty, so I decided to get it.


After that are these leather (well, fake leather) bracelets. One of them says "Aries" and has a picture of a ram - the animal that represents Aries - that I got because I'm an Aries and it looked pretty.


Next I got an arm cuff and a set of silver bangles. These are also for my Halloween costume. I got as much in silver as I could because I think I look better in silver than gold, but some of the jewelry only came in gold, so I had to settle for it.


As for necklaces, I got these two. The mustache one is for everyday wear, and the other one is for my Halloween costume. Both of them only came in gold, so that's why I couldn't get silver.


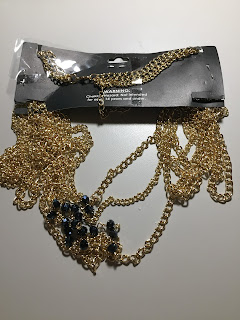
The item of jewelry I'm most excited about is this one - it's a body chain. I anybody is interested in seeing how it works, I'll be posting pictures of my Halloween costume soon, and this will be part of it.


The last items of jewelry I got were these ear cuffs. I love wearing ear cuffs, and I also wanted some for my Halloween costume, so I got all of these. The one in the middle is my favorite.


Lastly, I got these cute sticky notes! I saw these and thought that they were too cute to not get. I also got some temporary tattoos for my Halloween costume and a belt for it, but I won't be showing them in this haul. I may show them in a different post, if anybody expresses interest.

Wednesday, October 14, 2015

Palette Collection

My Palette Collection

This will be similar to my lippies collection, but it's about palettes instead of lip products. I only have four eyeshadow palettes, so I'm also including my contour palette. I am in no way trying to brag - I just enjoy these types of posts and thought that maybe others would too.

This is the Makeup Revolution Iconic 3 palette - my current favorite! I really like all the shimmery shades and the mattes are nice too. I mainly like the shimmers, though. The sixth shade from the left is my absolute favorite in the entire palette.


Next is the Makeup Revolution Redemption palette, which I have yet to really play around with. I originally got it because I needed more matte eyeshadows, but I don't know how much I'll end up using the lighter shades, so maybe I should have gone for a palette with more dark shades. Still, it's a nice quality palette, and I'm glad to have a matte black in my collection as well.


This is the Too Faced Chocolate Bar palette. This used to be my favorite palette, but I like the Iconic 3 a bit more. It has a really nice highlight shade, though, which I use on my cheekbones. It's called Champagne Truffle.


Next is the Urban Decay Electric palette. I love bright colors, so this is a great palette for me. I've gone through phases of using it every single day, although I'm more into neutrals at the moment. If you like bright and pigmented colors, then this palette is for you!


Lastly is the Anastasia Beverly Hills Contour palette in Light to Medium. I use this whenever I contour, and it's great for that, as well as for eyeshadows. It's pigmented, but not so pigmented that you can easily overdo it.

Sunday, October 11, 2015

Bright Eye Tutorial

Super Bright Eye Makeup Tutorial

I wanted to do a bright look to change things up a bit, since I've been doing a lot more neutral looks lately. I also really like bright, colorful looks, even for everyday wear. I've worn looks like this out many times and I think it's wearable if you have the confidence to pull it off. I used only shadows from the Urban Decay Electric palette.

Use the shade Urban in the crease. Make sure to blend it well, especially at the top.


Apply the shade Jilted all over the lid and blend it into the crease shade well. This is a really nice pink-purple color.


Put the shade Savage on just the middle of the lid. It adds a nice pop of extra brightness.


Use a sparkly blue liner and make a wing. I like how this looks better than black liner, but you could use either.


Curl your lashes, apply mascara, and you're done! This would look good with false lashes as well, and paired with a peach or coral lipstick.

Lippies Part Three - Lipstick

My Lippies Collection Part Three - Lipstick


This is the third and final part of my lippies collection, lipsticks! I also including a few stains and miscellaneous lip products that didn't really fit into any category. I hope you like it!

First of all, we have my biggest one-product collection, Wet' n' Wild MegaLast lipsticks. I use these a lot, so I have a lot of colors. I did a review and lip swatches of these a while back, if anybody is interested.


Here I have three random lipsticks. I got the one on the left from Dollar Tree, the one in the middle as a gift, and I forget where the one on the right is from.


Next are these Wet' n' Wild lipsticks. The packaging gets messy very easily and I couldn't be bothered to clean them, so they're kinda messy.


After that are these two NYC Expert Last lipsticks. I also have a review and swatches of these on my blog, if anybody is curious.


From left to right, we have a Rimmel lipstick, a Maybelline lipstick, one from NYC, one from Beauty Treats, and one from Burt's Bees.


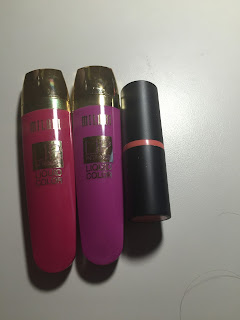
Next I have two Milani liquid colors and an Essence longlasting lipstick. I got the Milani ones from Dollar Tree and the Essence one from Ulta.


Here are three Wet' n' Wild Natural Blend lip shimmers. I've been trying them out recently and I like them so far.


These are some of my lip crayons. The letters on the one on the outer left have worn off, so I don't know where it's from. The inner left one is from Wet' n' Wild, and the one on the inner right is from Revlon. The one on the outer right is my all-time favorite lippie, which is from Tarte.


Lastly are three e.l.f. stains. They work okay, and they last a long time, but they can be pretty unpigmented.