Tuesday, May 10, 2016

DIY Rainbow Highlight

How To Make Your Own Rainbow Highlight

You may have heard the hype about the new rainbow highlight from Bitter Lace Beauty, and you may have also heard about how quickly it sells out every time it's restocked. Because the highlight is made by hand, this is understandable, but it's also understandable to want to get your hands on one immediately because it's absolutely gorgeous! I don't own the original product so I can't say whether or not this DIY makes an exact dupe or not, and I'm guessing it doesn't, but I can say that it makes something pretty darn cool. Reddit user The Kitten Butcher seems to be the original creator of this DIY from what I can tell, so all credit goes to her for this idea! I simply took her idea and twisted it a bit so that my highlight would turn out more wearable than the rainbow one (although I ended up making a few in the end, including a rainbow one).

These were all of my supplies. I used the muffin cups to keep the colors separated while I was mixing them, but you could use any small container. Muffin tins work well and are washable. You will need -
-A container for each color
-Eyeshadows in the colors of either the rainbow or the colors you want in your highlight
-A highlight you don't mind crushing up
-Isopropyl alcohol (mine is 97% because that's what I had on hand)
-A compact for the finished highlight
-Toothpicks, a spoon, or preferably both
I also used blushes in place of eyeshadows because I had more blush colors that I wanted in my first highlight than eyeshadow colors.


Choose your colors (I chose six for my first highlight) and crush them up as best you can, each in their own separate container, and mix them with your powder highlight of choice. Use an equal amount of highlight and eyeshadow in each container if you can. More highlight means less pigment but more highlight-y-ness/shimmer. Using a spray bottle or dropper, add small amounts of alcohol into each container until a paste is formed. Add the pastes into the compact in stripes in the order of the rainbow or whatever order you want. The great thing about this DIY is how customizable it is! I wanted my first highlight to be very wearable and warm tones so I stick with orange and pink shades.


If you want to you can press he top of the highlight gently with a paper towel to absorb excess moisture. The original creator of this DIY said to do this until the color stopped transferring but that was taking forever so I just stopped after a few minutes.


This is my highlight still wet. I let it dry overnight...


...and it was done! The swatch I show here isn't the best because it wasn't in great lighting and it's pretty subtle but in person this highlight turned out gorgeous. I love how I can just use certain colors, swirl all of them together, or layer them for different effects!


Here are two more of the highlights I ended up making.


This is a swatch of the rainbow one. It's more colorful than illuminating but if you want a rainbow on your cheekbones then this will do the trick! I would love to make tons more but I'm currently almost out of powder highlight so I have to wait until I'm able to get some more. I actually just use this giant eyeshadow from ShopMissA in the shade 4 as my powder highlight, but it's my only one so what little I have left after this DIY is for my face.

Monday, May 9, 2016

Peel-Off Lip Tattoo

Peel-Off Lip Tattoo First Impression

I've been hearing a lot about these peel-off "lip tattoos" so of course when I saw some on ShopMissA for a dollar each I had to try one out. They only had a couple of colors left in stock, so I ended up choosing the shade Kiss Orange.


The instructions say to apply the product to your lips then wait 5-6 minutes before peeling it off. I've heard bad things about some of these lip tattoos, like that they make your tongue feel numb if you get it in your mouth, so I was a bit worried, but the worst part was the smell, which wasn't the worst. It smelled exactly like when you dye eggs on Easter, but not as strong. It had a slightly unpleasant taste but I managed to not get much in my mouth.


It looks like a really pigmented gloss when you first put it on. It's really sticky and as it dries it's hard to move your mouth to talk.


Once I peeled it off, this is what it looked like. It almost made my lips look bloody, although I assume that's more of an issue with the shade than the product. The stain it leaves is pretty sheer and uneven. There are many variations of this product from different brands, so other ones would possibly give you better results, and I would say that overall this is a trend that's worth giving a try if it interests you. I probably won't be using this product on a regular basis but it's fun to play with and this one was only a dollar.

Friday, May 6, 2016

Products I Want To Use Up Update

Products I Want To Use Up In 2016 Update Four

I decided to get rid of the body butter and lip gloss categories entirely for the year because I haven't used products in those categories at all and I know I won't be using anything up in those categories. I have been sick this month as well as very bust so I haven't made very good progress, but I think I'll do better in May.

Lipstick

I've barely used my MAC lipstick in Brave at all this month, but I think I'll get good use out of it next month. I think that using it up this year is still very doable.


Foundation

I'll admit that I've barely touched this foundation in April. I discovered the Revlon Colorstay and I love that so much that I didn't want to use anything else, but I'll make an effort to use this more in May.


Powder

I finished a powder! My goal is two powders this year and this one is my first, so I'm halfway there. I even took out the sifter so that I could use every single bit of product because I really liked this powder.


Eyeliner

I've decided to focus on a mini eyeliner so that I actually have a chance to use it up. I got this mini Marc Jacobs liner as part of my Sephora birthday gift this year and I have so many black eyeliners that I don't need another mini one cluttering my collection.


Nail Polish

The nail polish is nearly gone! I think that one or two more uses and it'll be done.


Lip Butter

I totally finished my Nivea lip butter! Since I had reached my lip balm goal, I used this instead of lip balm, so it went pretty fast. I still have another one in a different scent, but I won't be rushing to use it.


Lip Scrub

I'm nearly done with the lip scrub! I already have backups because I've grown to really enjoy this product and it's only  a dollar on ShopMissA. I predict that this will be done within the next month.


Eyeshadow

Because I hit pan on both of the shadows that I set goals on last month, I'm going to take a break from panning shadows this month and just use whatever I want. I have some new palettes and I want to play around with those before I commit to using anything up.

Thursday, May 5, 2016

ShopMissA Haul

ShopMissA Makeup and Jewelry Haul

I recently made my fifth order from ShopMissA, which is a website where everything is a dollar. I got some jewelry this time hoping that it would push me to accessorize more. I never end up wearing jewelry unless it's a special occasion and I think I should wear it more, so I got some new things to accessorize with.

I got a ton of earrings and only ended up getting one ring. Most of their rings are for ring sizes 7-8 and my ring size is about a 10 so I have to get their adjustable rings and this was one of the only ones in stock at the time. I have two piercings in each ear so I like sets of earrings because they give me ideas of which earrings to pair together.


I got a lot of bracelets because I like to layer them. I think the black dangly one is my favorite, although I do love the turtles on the blue one.


I was really excited about the emoji necklace because I thought it would be fun to pair with my emoji shirt, and I liked the other necklace because I love silver and turquoise together. I know that close up it looks a bit cheap but from further away it doesn't look bad so I don't really mind.


ShopMissA recently came out with their own sponges and brush cleaning eggs, so I got them. I got two sponges in case I ended up really liking them so I'd have a backup if they sold out. They claim to be made in the same warehouse as "the beauty industry-leading makeup blender brand" so of course I immediately thought they could be a dupe for the Beauty Blender. I recently got a Beauty Blender and just by feeling these sponges I can tell that they won't be exact dupes. They feel a lot more dense and less lightweight. But if they give the same results as the Beauty Blender, then I would be happy with that. As for the brush cleaning egg, I already have the Real Techniques brush cleaning palette as well as a textured silicone oven mitt I use to wash my brushes on, but I wanted to do a post comparing all three methods and seeing which was best.


I needed an eyelash curler just to toss in my makeup bag, so I figured this one would work. I've tested it out and I do prefer my normal Revlon one but this isn't bad.


This is the KleanColor FemmeAdvice Matte Eyeshadow Palette in 7 Be the Boss. I chose this one for the orangey warm tones because I really like those. I figure that since you're getting 8 shadows for a dollar the quality probably won't be great but when I swatched them they didn't seem too bad.


I got this Santee Super Smooth Concealer in the shade #7 because it looked like it would be really light, and I was correct. I still need to test if it will break me out, but if it doesn't then this may finally be something I can use to highlight my undereyes.


I'm almost out of my Beauty Treats Lip Scrub in Almond Creme, and even though it's technically a bit cheaper to make my own lip scrub, I really liked the almond one so I wanted to try out more flavors. Besides, at a dollar each, it's not like this is particularly expensive either.


I like the Beauty Treats lip scrubs so much that I was dying to try their other lip care. I went with the rosehip oil one because I've never tried a rosehip lip balm or treatment before. You seem to get quite a bit of product so if it end up being good then I can definitely see myself getting the other kinds.


I got two lipliners because I have a lack of lipliners that I actually wear. So I went for more wearable shades, although the brownish one looked a lot lighter on the website. If I don't end up using it then I'll give it to a friend who will.


I didn't have any colorful liquid liners anymore so I picked up a couple in pink and purple. The pink one seemed a bit clumpy when I swatched it, but the purple one went on super smoothly.


This eyeliner was far too cute not to get. It's like a little bear! I really don't need another black liquid liner right now but I'm okay with getting another one if it's this adorable.


I've been getting interested in cream blushes lately, so I decided to give this one a go. It's in a nice wearable color and the texture seems pretty good. It isn't super greasy and it seems pretty blendable.


These lip tattoo stains seem to be blowing up on the internet so I wanted to try one out for myself and see what the hype was about. I watched some YouTube videos on them and they seem terrifying but I'm willing to give it a shot.


I got two Amuse Creamy Matte Lipsticks in the shades 1 and 8, mostly because the packaging looked gorgeous. When I swatched them the lipstick looked matte but it didn't pull at my skin so it might not be a super drying formula which would be nice.

Wednesday, May 4, 2016

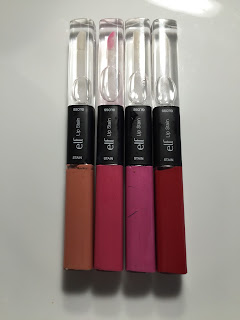
e.l.f. Lip Stains

e.l.f. Lip Stains Lip Swatches and Review

During the e.l.f. moving sale, I managed to get all four colors of their Studio Lip Stains for a dollar each. They're usually $3.00 USD, which isn't a bad price, but if you can get them for cheaper then definitely do. In this picture I have them in the order (from left to right) of Heartbreaker, Fashionista, Birthday Suit, and Red Carpet. The colored side dries to a matte looking finish, but it isn't totally transfer-proof so that means it isn't super drying. You can layer the gloss on top for a glossy finish, but I find that when you do that it makes the color underneath separate and go patchy if you aren't careful. My recommendation is to use just the colored side and go for a matte look. It's pretty long lasting and it layers well so it won't go all weird like some liquid lipsticks do when you try to touch up. I will mention that they have a bit of an odd smell so if that bugs you, you may want to steer clear of these.


This is Heartbreaker on my lips, without gloss on the top and with gloss on the bottom. It's a bit sheer so you may want to layer it a couple of times if you're going for a more opaque look. I find that the best way to apply the gloss is to dab rather than swipe, otherwise it will disturb the color.


Here is Fashionista on my lips, matte on the top and glossy on the bottom. This color seemed to be a bit crumbly on the inner part of my lips for some reason, but none of the other colors did that.


This is Birthday Suit. This one is the sheerest and needs the most building up. It's also the most easily disturbed by the gloss.


Red Carpet s my favorite shade because it's the least sheer and the gloss doesn't disturb it as easily. It's a very pretty red as well. If I had to choose one shade to keep it would definitely be this one.


Overall, I think these are decent lip products and if you're just getting into makeup and don't want to spend a lot of money then they might be for you. But if you already have lots of lip products that you love, this probably won't be anything special. None of the colors are especially unique, and the formula isn't all that great in my opinion, although it certainly isn't terrible either. Is it worth $3.00? Yes, and definitely worth the $1.00 each that I paid. But I don't see myself wearing them very often.

Tuesday, May 3, 2016

Morning Skincare

My Super Simple Morning Skincare Routine

I want to be totally honest - I don't do this every single morning. I skip at least one step a lot of mornings because I'm lazy. Because I have very well behaved skin, I can get away with it. This is just what I do on mornings when I have the time, energy, and lack of laziness to do everything I would ideally do to take care of my skin when I wake up. I'm very lucky when it comes to my skin - not only do I for the most part have normal skin (with the occasional dry patches), I have very little acne. I think that genetics have a big part to play in this as neither of my parents ever had really bad acne, but my skin is still pretty great. I think I also outgrew my acne a bit, since my "bad" acne (if you could even call it that, because even back then it wasn't that bad) happened back when I was between 12 and 14. So even when I slack on skincare, my skin tends to look pretty darn good, and when I'm keeping up with my skincare, my skin looks pretty much flawless. I don't mean to brag about it at all, but it is true - I just happen to have nice skin. I am very lucky to have it and I wish that there was some secret to it I could share but for me there really isn't one, it's just genetics and luck. If you do struggle with bad acne, I suggest good skincare and if that doesn't work then ask your doctor what to do because acne can really diminish your confidence and that's not something you should have to deal with.

This is just my morning skincare routine. My evening skincare varies depending on if I wore makeup than day and how long it's been since I exfoliated, so I'll save that for a different post. I know that some people recommend using things like toner in the evening but I use it in the morning and I don't have any issue so I recommend experimenting with your skincare and figuring out what works best for your skin because everyone has different needs when it comes to skincare. Also please keep in mind that a product that works well for me might work terribly for you, so even if I highly recommend a product, do your research before trying it and don't expect it to work the same way for you. For reference, I have normal skin with occasional dry patches, mostly under my eyes, and I tend to get very dark undereye circles due to sleep issues and the fact that I am very light skinned.

The first step when I wake up is to cleanse. I find that a cleansing or micellar water works just fine. I prefer the Garnier Micellar water with the pink cap over this Sephora Triple Action Cleansing Water because it's cheaper and works just as well without stinging my eyes, but since I'm not removing eye makeup in the morning I'm using the Sephora one until it's gone. I squirt some onto a cotton round and use that all over my face to cleanse.


I use the same method as I did with the cleansing water to apply toner. I found this toner at Ross for $6.99 USD. For a list of reasons to use toner, click here. I like to use it as a second cleansing step as well as a way to help feel refreshed as it feels nice and cooling after the bottle is sitting out on my desk overnight. I've used DIY toners in the past, made from green tea, witch hazel, and water, but I like this more as it's less drying.


I use the Nivea Original Daily Moisture Body Lotion as my daily facial moisturizer. I do not recommend using most body lotions as facial moisturizers, but this particular one works for me, so I continue to use it. I know you aren't technically supposed to, but I've never run into problems doing it, so I will continue to use it o my face until I run into issues. My skin simply does not need a highly moisturizing, specialized face cream, and I don't really have the money to be regularly buying lots of expensive skincare. My only expensive skincare item is my eye cream, which I will show you after this. I apply this moisturizer all over my face and neck, avoiding the eye area as I apply my eye cream there and I don't want to over-moisturize the area.


I use the Origins GinZing eye cream, although I haven't actually opened this one yet since I still have some of my deluxe sized sample from my Sephora 100 point perk left. I apply it to my undereye and lid area using my middle or ring finger in a large circular motion. I find that this eye cream hydrates really well and truly helps with my dark undereye circles (when I remember ti use it regularly). It's even almost shimmery without actually having shimmer so it brightens the area you apply it to immediately after application.

Monday, May 2, 2016

Rite Aid Haul

Rite Aid Makeup Haul

This will be one of the last hauls for a while, although I do have one more order coming in so that will be the actual last haul. I wanted to get a few things from the Wet' n' Wild spring collection, but sadly my Rite Aid didn't have them. I'm not sure if they were Walgreens exclusive or if they just weren't at my Rite Aid but either way I got some good things anyways.

One thing I did get from Wet' n' Wild was one of their new brushes. All they had in stock were the powder brushes so that's all I could get my hands on, but I definitely want to try more. It's really soft and it seems like it would work really well.


I've been wanting this foundation for a while now, but sadly I tested it on my skin when I got home and it's a bit too dark. I'm going to keep it for now because I plan on getting some white foundation mixer at some point and I really want to try this out, but in the meantime I can't really use it.


I saw these masks on the bottom of a shelf and decided to give them a try. My undereyes have been looking not that great lately so I'm especially looking forward to the undereye mask.


This Jesse's Girl Pure Pigment Eye Dust in Kiwi Rose was on sale for 75% off so I decided to get it. I really like iridescent shadows and I thought that this would be nice to layer over other colors.


 This is a Jesse's Girl lipstick in Cruise Control. I've never owned anything from Jesse's Girl before now and I figured that these products were a good place to start. This was my favorite shade that was on display and really the only one I thought I'd regularly wear. I will say that it smells quite cosmetic-y rather than like vanilla or something nice.


Certain shades of the Revlon Lip Butters were on sale for about $2.00, and I got the shade Strawberry Shortcake. I love the one I already have in the shade Juicy Papaya because it's super pretty and really moisturizing at the same time.


I got two Revlon Super Lusterous Lipsticks in the shades Rosedew and Demure since they were buy one get one 50% off. I'm trying to branch out and try more drugstore lip products, and I hear that these lipsticks are really good.